


Beste løsninger for å fikse iPhone “Kan ikke bekrefte serveridentitet”
iPhone er kjent for sin smidige og sikre brukeropplevelse, men som alle smartenheter er den ikke immun mot sporadiske feil. Et av de mer forvirrende og vanlige problemene iPhone-brukere støter på er den fryktede meldingen: «Kan ikke bekrefte serveridentitet.» Denne feilen dukker vanligvis opp når du prøver å få tilgang til e-posten din, bla gjennom et nettsted i Safari eller koble til en tjeneste som bruker SSL (Secure Socket Layer).
Denne meldingen vises når iPhonen din prøver å validere serverens SSL-sertifikat og finner noe galt – enten sertifikatet er utløpt, ikke samsvarende, ikke klarert eller avlyttet av en tredjepart. Selv om det kan virke som et sikkerhetsproblem, er det ofte forårsaket av mindre innstillinger eller nettverksrelaterte problemer.
I denne veiledningen lærer du de beste løsningene for å løse problemet «Kan ikke bekrefte serveridentitet» på iPhonen din og få alt til å fungere knirkefritt igjen.
1. Populære effektive løsninger for å løse iPhone-feilen «Kan ikke bekrefte serveridentitet»
Nedenfor finner du flere effektive løsninger du kan prøve – fra raske omstarter til mer dyptgående justeringer.
1) Start iPhone på nytt
Start med en enkel omstart – skyv for å slå av iPhonen, vent noen sekunder, og slå den deretter på igjen.
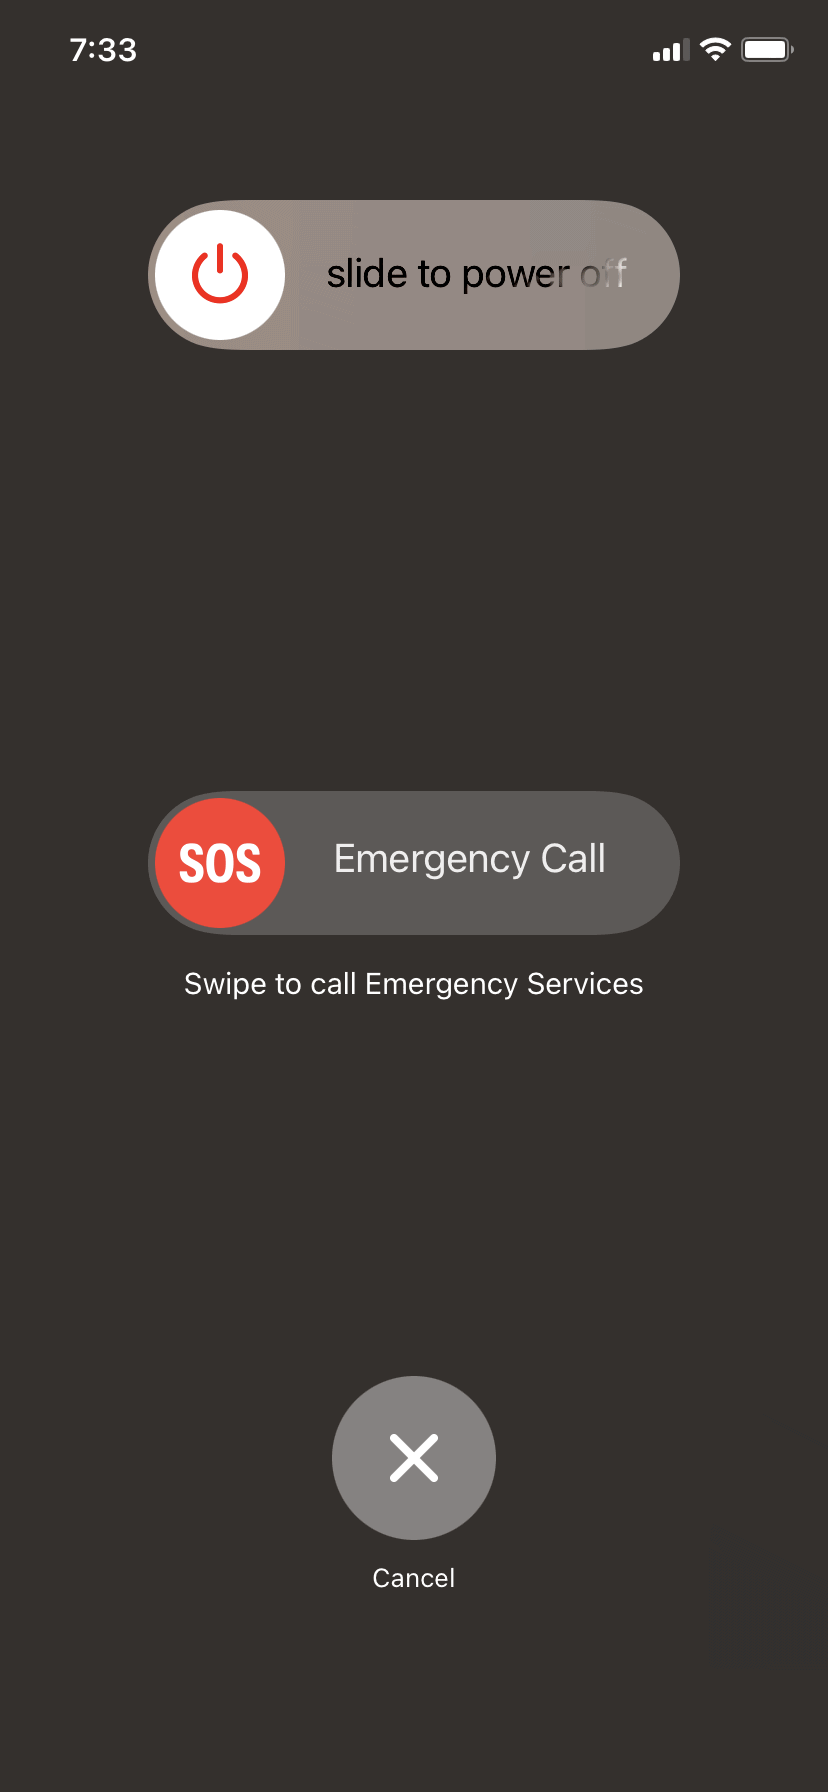
Hvorfor det fungerer: Midlertidige programvarefeil kan noen ganger forstyrre verifisering av SSL-sertifikater.
2) Slå av/på flymodus
Sveip ned for å åpne
Kontrollsenter
, trykk på
Flymodus
ikonet, vent i 10 sekunder, og slå det deretter av.
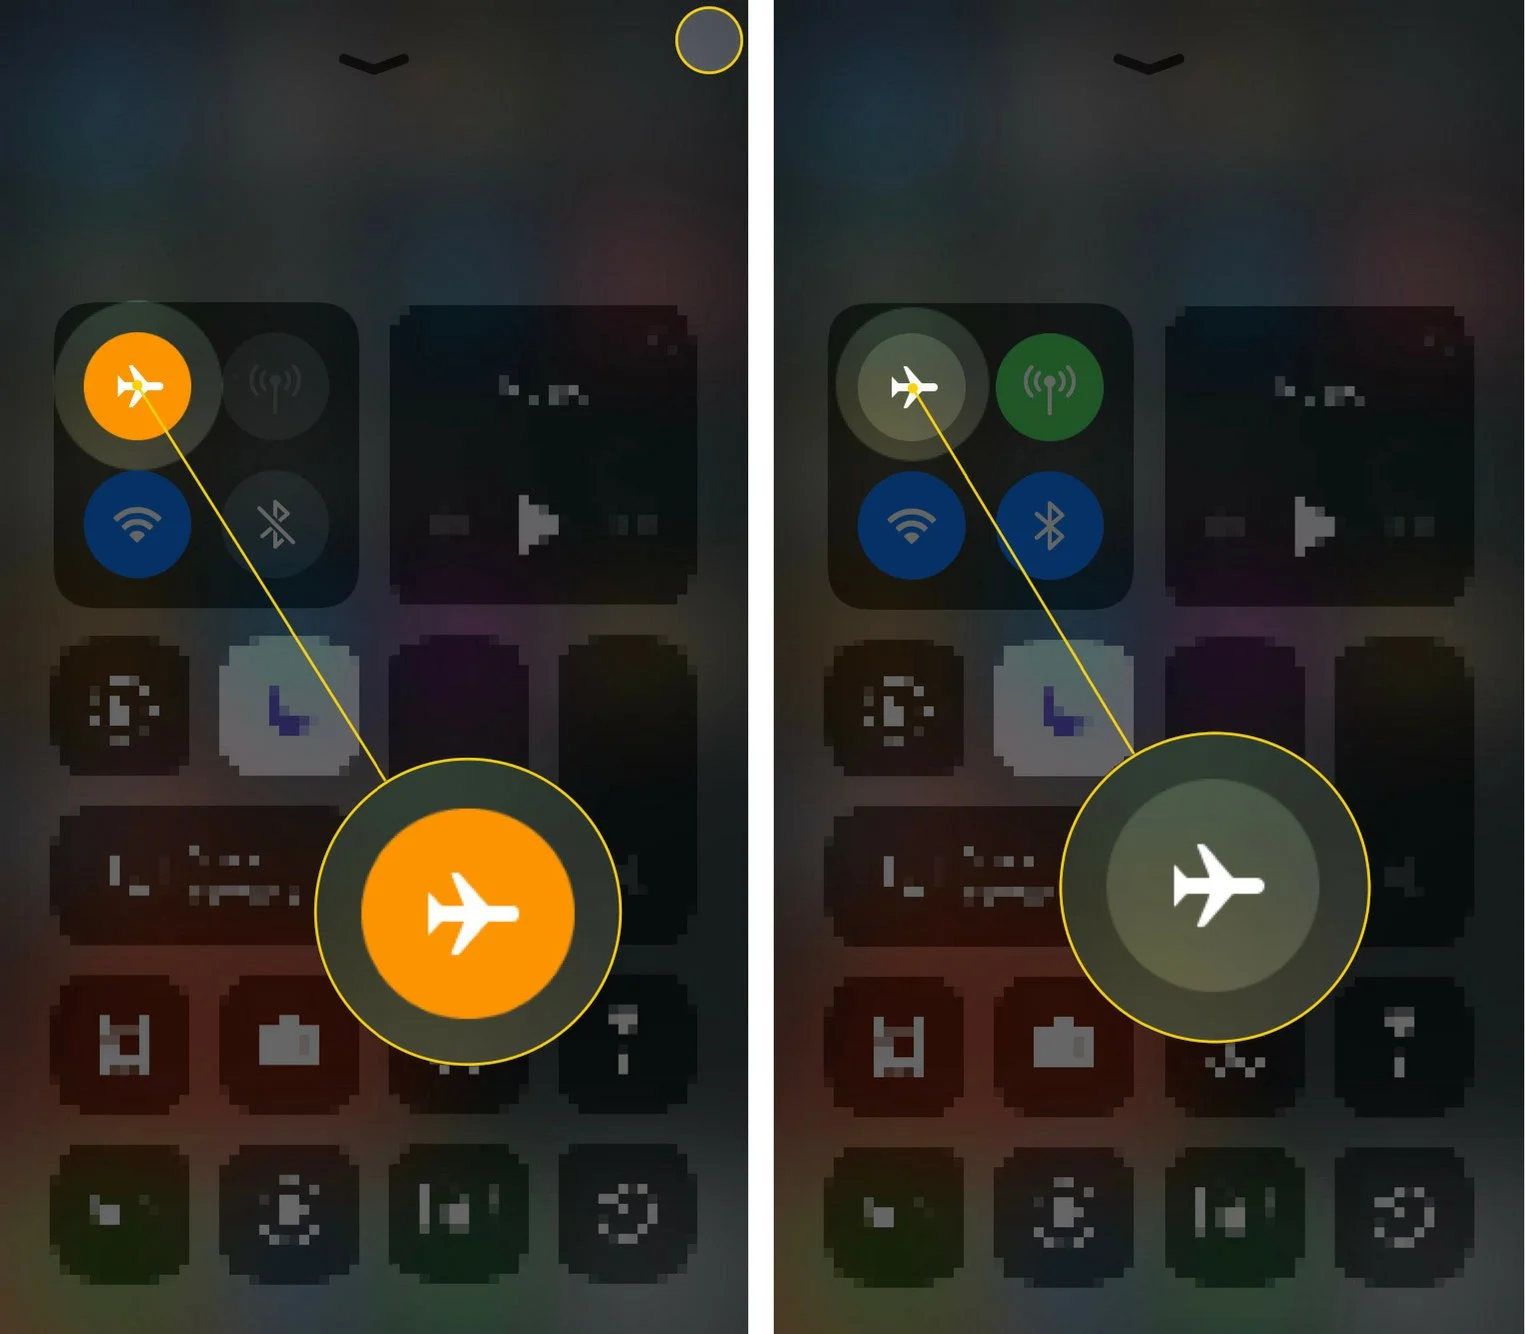
Denne handlingen tilbakestiller tilkoblingen din, noe som kan løse problemer knyttet til serververifisering.
3) Oppdater iOS til den nyeste versjonen
Apples oppdateringer inkluderer ofte forbedringer av sikkerhet og sertifikater – bare gå til
Innstillinger > Generelt > Programvareoppdatering
og trykk
Last ned og installer
hvis det finnes en tilgjengelig.
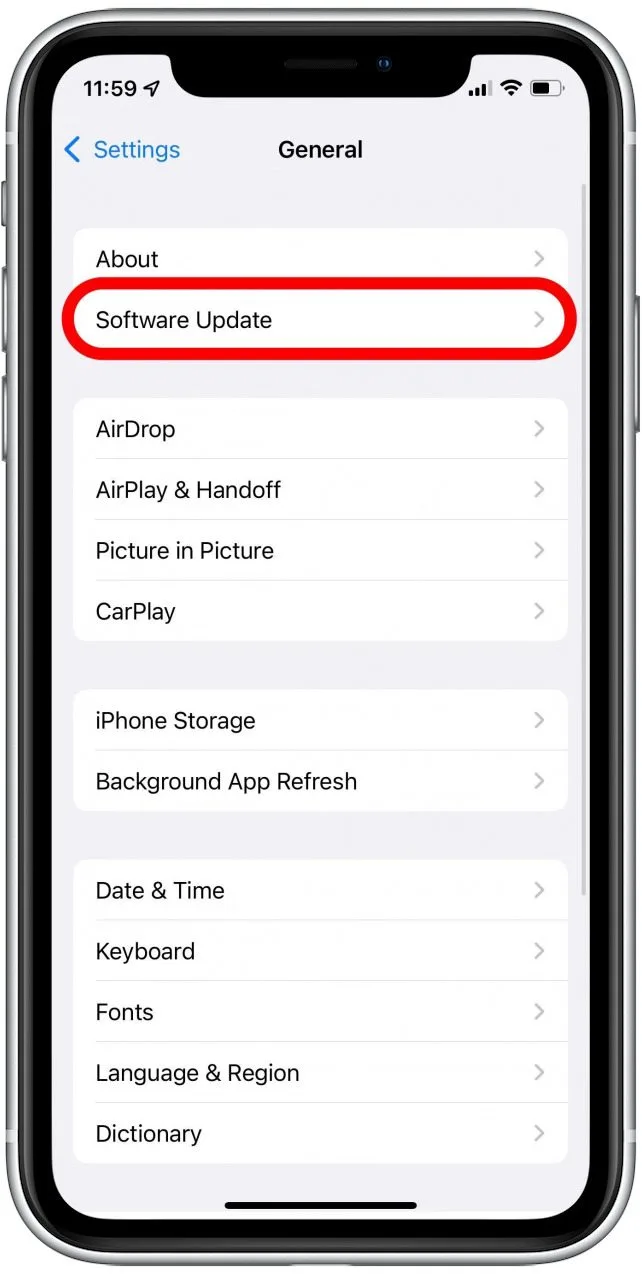
Hvorfor det fungerer: Utdaterte iOS-versjoner gjenkjenner kanskje ikke oppdaterte eller nye SSL-sertifikater.
4) Slett og legg til e-postkontoen din på nytt
Hvis Mail-appen viser dette problemet, kan du prøve å fjerne kontoen og legge den til igjen.
Gå til
Innstillinger > E-post > Kontoer
, velg den problematiske kontoen, trykk på
Slett konto
, og gå deretter tilbake til
Legg til konto
og skriv inn innloggingsdetaljene dine.
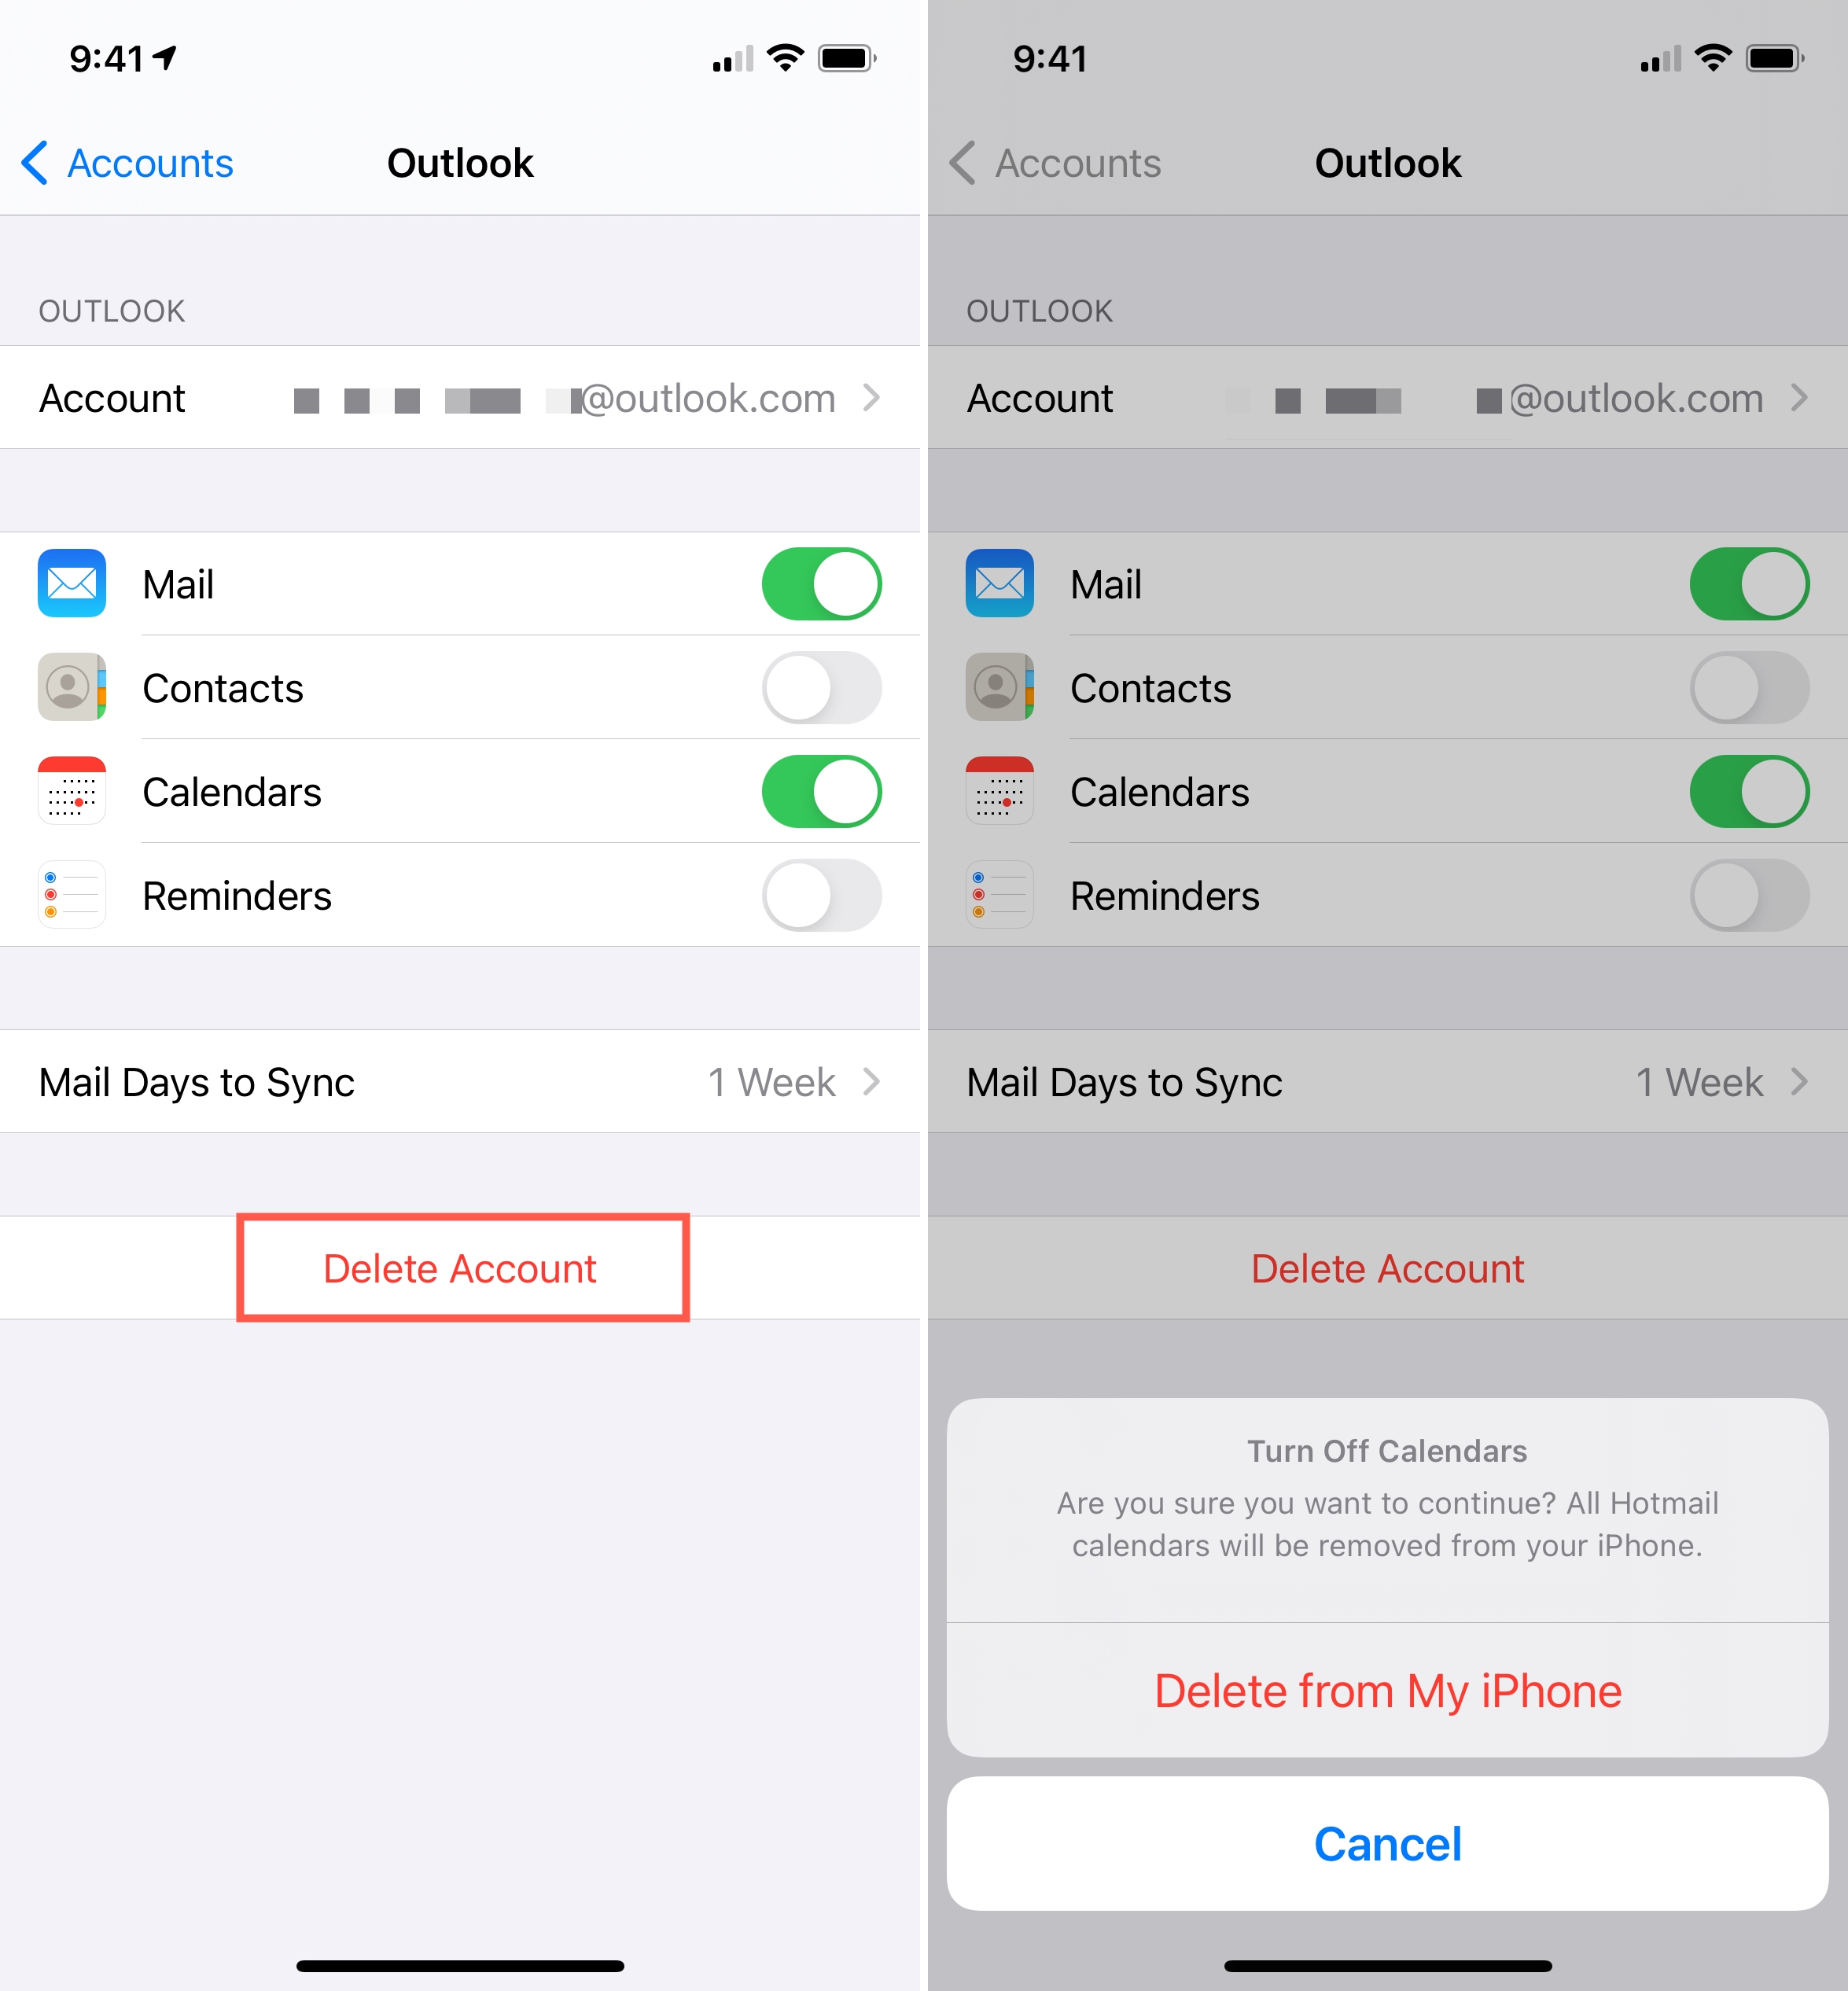
Hvorfor det fungerer: Skadet eller utdatert e-postkonfigurasjon kan forårsake SSL-avvik. Hvis du legger til den på nytt, fjernes dette.
5) Tilbakestill nettverksinnstillinger
Nettverksinnstillinger spiller en viktig rolle i SSL-kommunikasjon.
- Naviger til Innstillinger > Generelt > Overfør eller tilbakestill iPhone > Tilbakestill > Tilbakestill nettverksinnstillinger .

Dette vil slette lagrede Wi-Fi-nettverk og VPN-innstillinger, så sørg for at du har sikkerhetskopiert denne informasjonen.
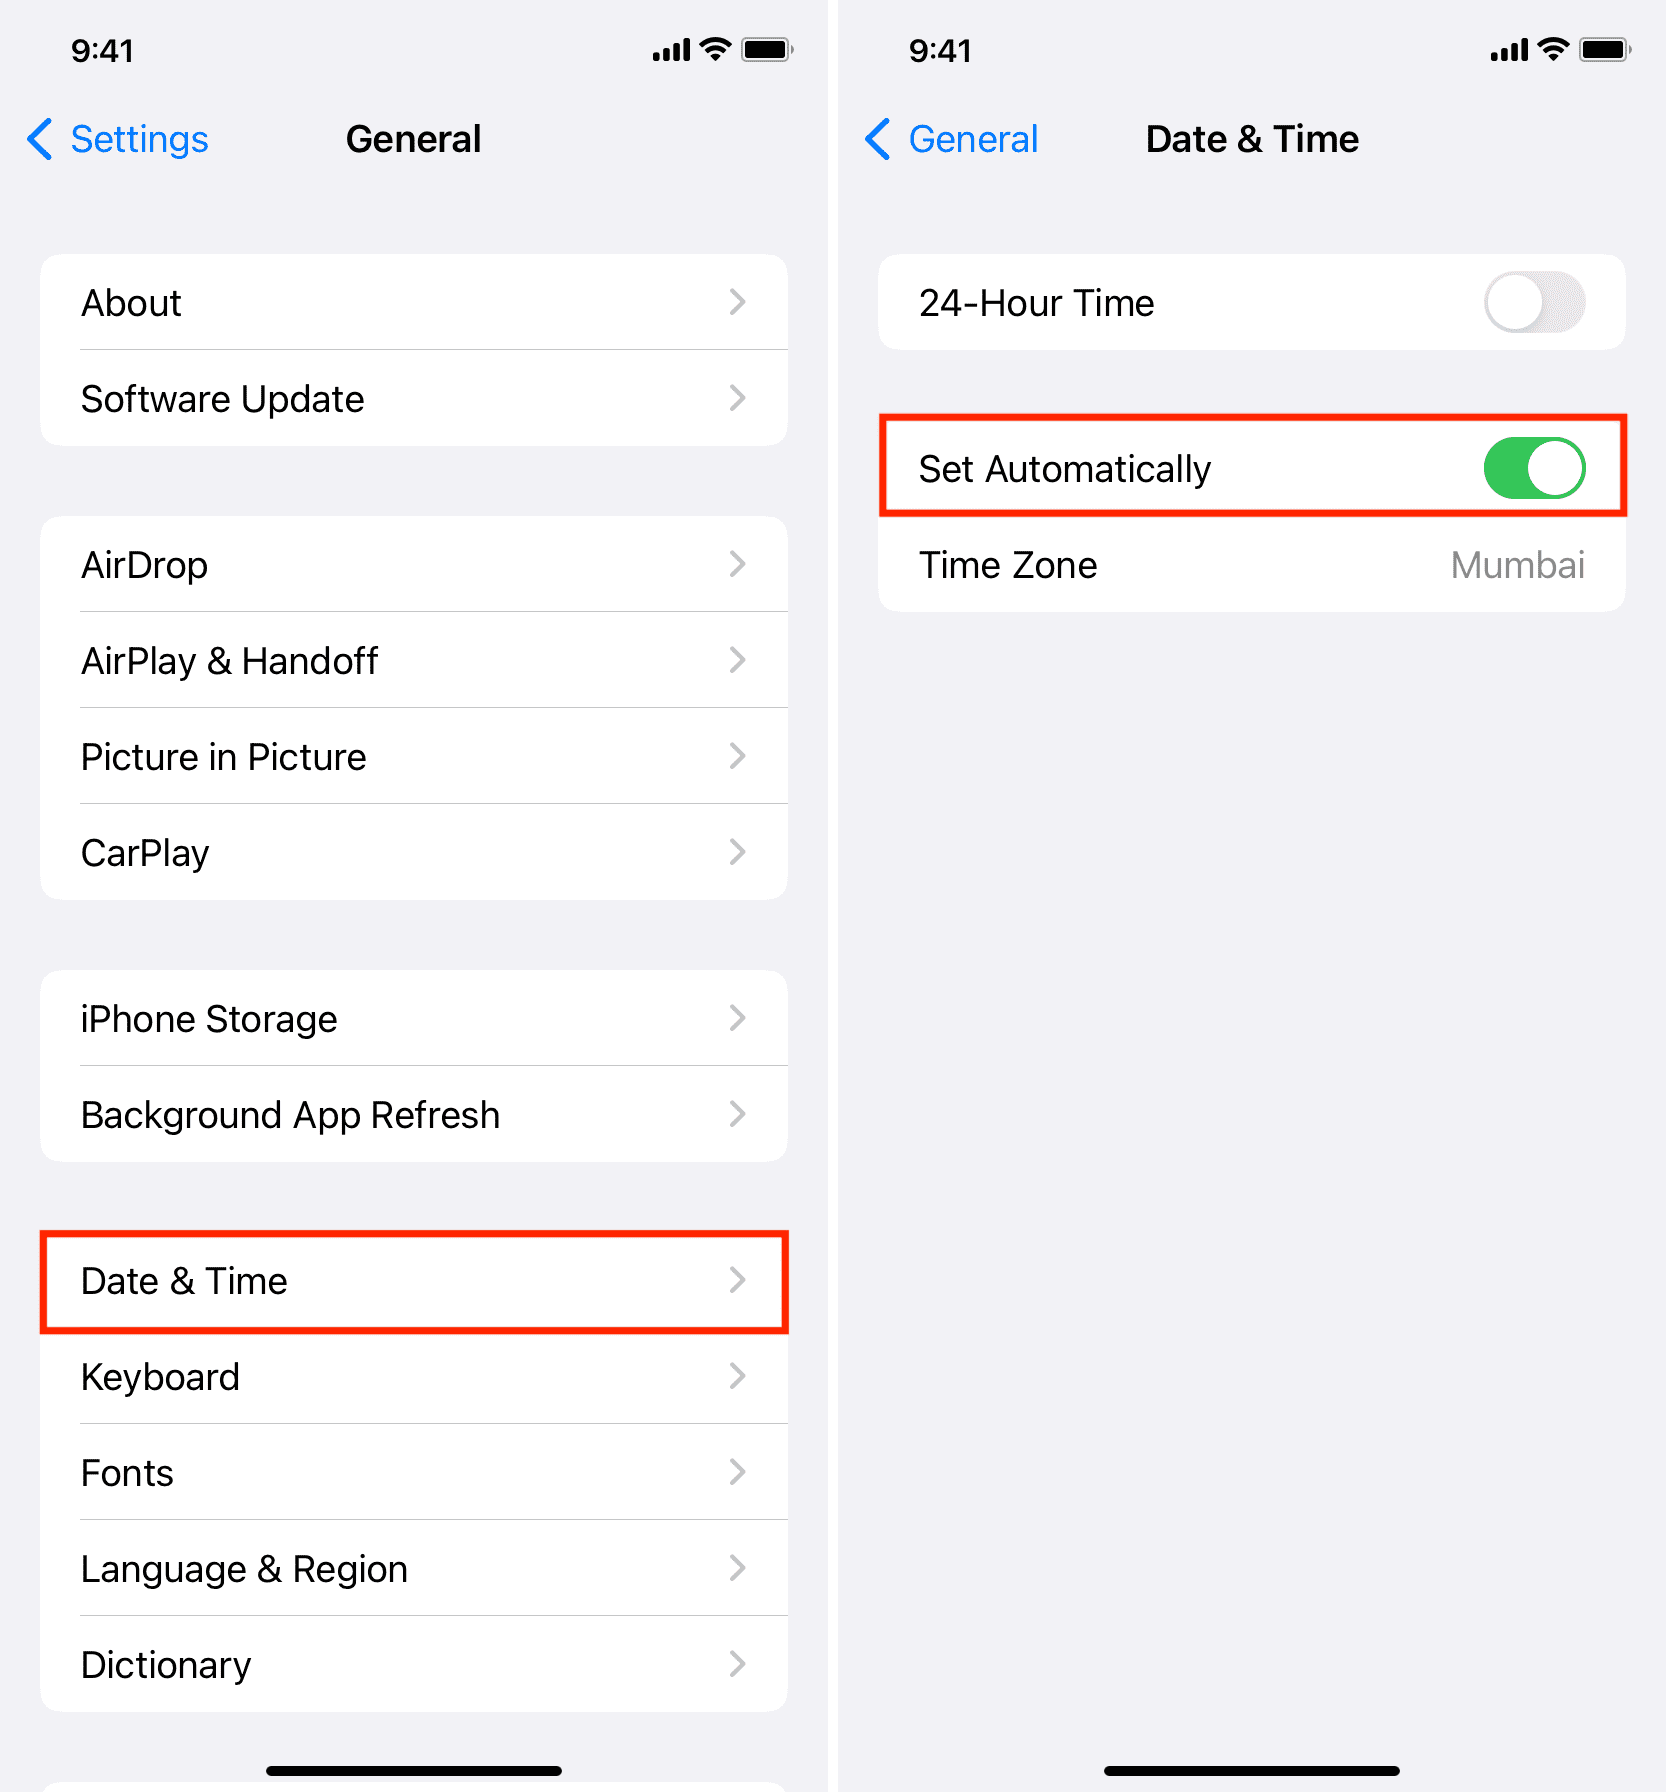
6) Angi dato og klokkeslett automatisk
SSL-sertifikater er tidssensitive. Feil systemtid kan føre til verifiseringsfeil.
For å fikse dette, gå til
Innstillinger > Generelt > Dato og klokkeslett
og aktivere
Still inn automatisk
.
7) Tøm Safari-hurtigbufferen (hvis det oppstår en feil i nettleseren)
Noen ganger er problemet relatert til et mellomlagret SSL-sertifikat i Safari.
- Gå til Innstillinger > Safari > Fjern historikk og nettstedsdata .
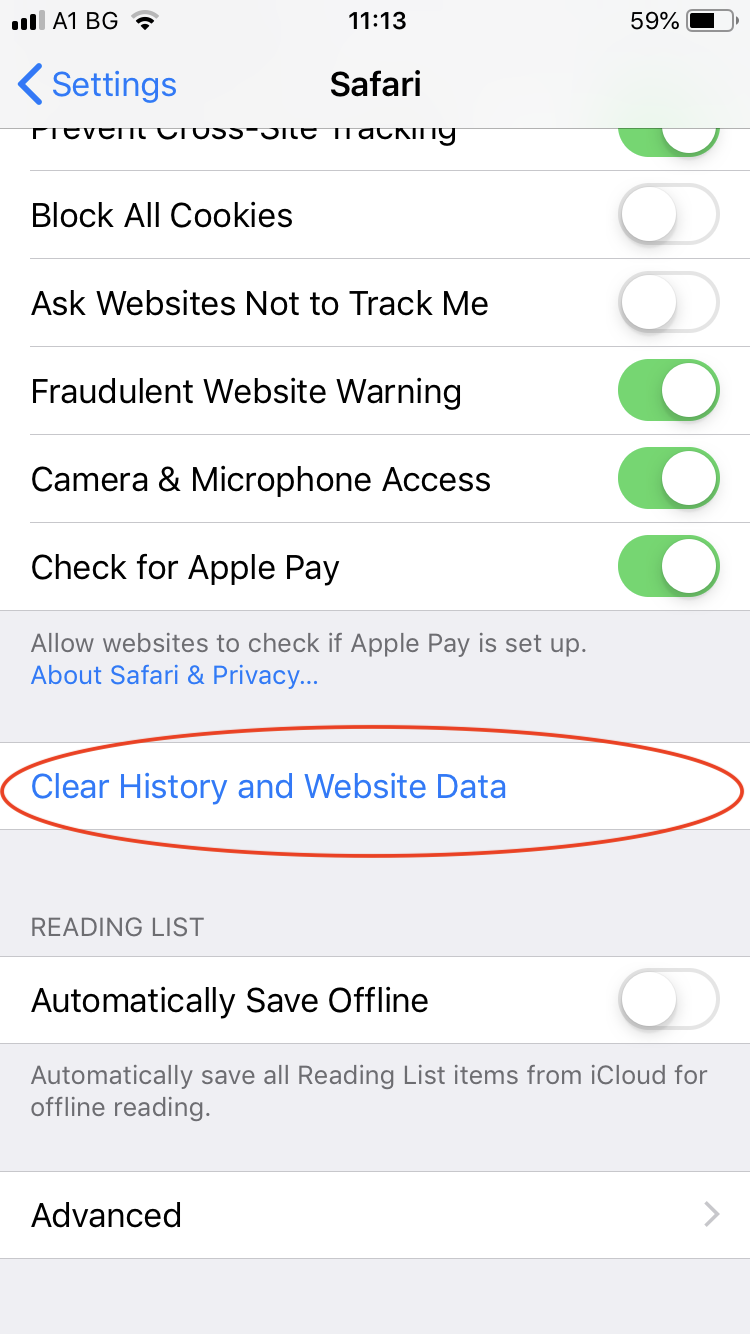
Dette fjerner all nettleserlogg, informasjonskapsler og hurtigbufrede sertifikater.
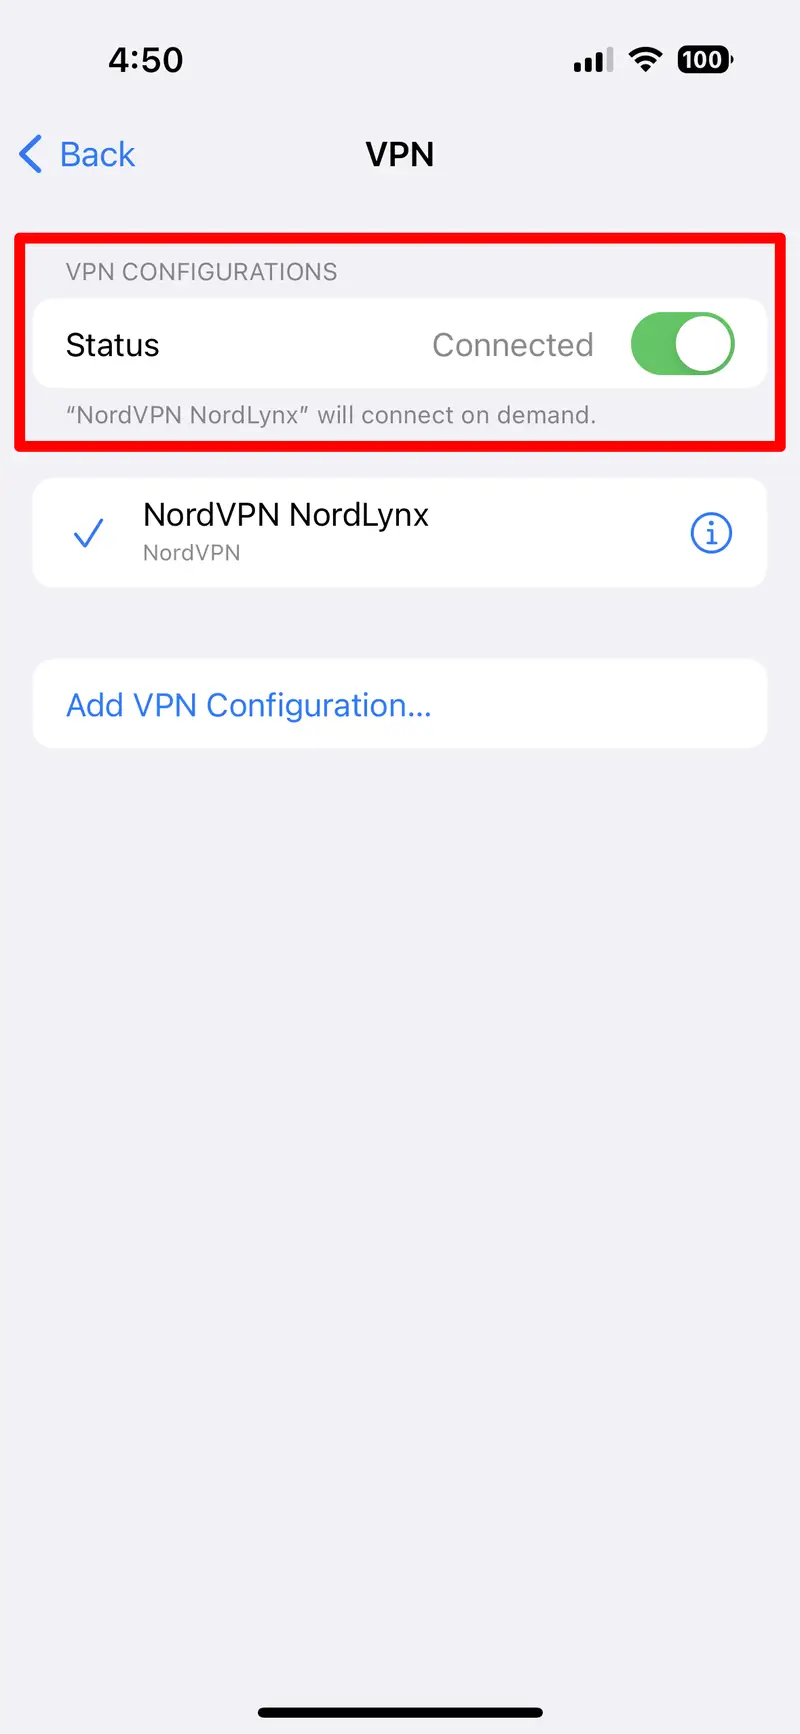
8) Deaktiver VPN eller prøv et annet nettverk
Hvis du er koblet til et offentlig Wi-Fi-nettverk eller bruker et VPN, kan disse blokkere eller endre sikre sertifikatkontroller.
Koble fra det offentlige nettverket og bytt til mobildata, og gå deretter til
Innstillinger > VPN
og slå av alle aktive VPN-er.
9) Bruk en alternativ e-postapp
Hvis Apple Mail-appen fortsetter å vise feilen, kan du prøve en tredjeparts e-postklient:
- Microsoft Outlook
- Gmail
- Gnist
Disse appene bruker ofte forskjellige metoder for å håndtere serversertifikater og kan omgå problemet.
2. Avansert løsning: Fiks iPhone-feilen «Kan ikke bekrefte serveridentitet» med AimerLab FixMate
Hvis løsningene ovenfor ikke løser problemet, kan det hende at iPhonen din lider av en dypere systemfeil eller iOS-korrupsjon, og det er her AimerLab FixMate kommer inn i bildet.
AimerLab FixMate kan løse mer enn 200 iOS-relaterte problemer, og tilbyr en alt-i-ett-løsning for problemer som:
- Fast på Apple-logoen
- Støvelløkker
- Frossen skjerm
- iOS-oppdateringsfeil
- «Kan ikke bekrefte serveridentitet» og lignende SSL- eller e-postrelaterte feil
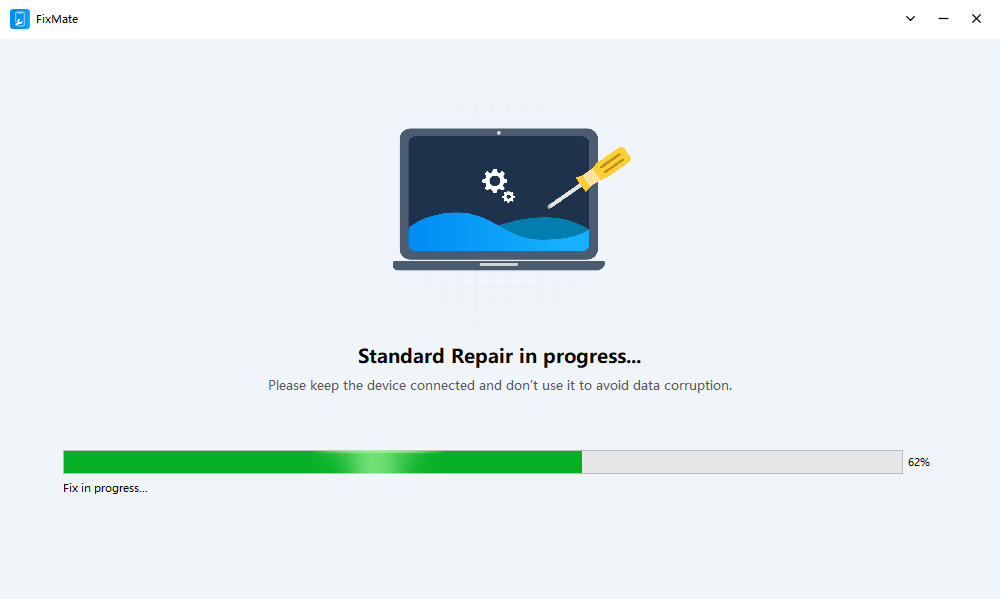
Steg-for-steg-guide: Fikse feilen «iPhone kan ikke bekrefte serveridentitet» ved hjelp av AimerLab FixMate
- Gå til det offisielle AimerLab-nettstedet for å laste ned FixMate Windows-installasjonsprogrammet og fullføre installasjonsprosessen.
- Åpne FixMate og koble til iPhonen din med en USB-kabel, og velg deretter Standard reparasjonsmodus for å reparere iPhonen din uten datatap.
- FixMate vil oppdage iPhone-modellen din og presentere riktig iOS-firmwareversjon. Klikk for å starte prosessen.
- Når fastvaren er nedlastet, klikker du på og bekrefter for å starte standardreparasjonen. Prosessen vil ta noen minutter, og iPhonen din vil starte på nytt og fungere normalt når den er fikset.
3. Konklusjon
Feilmeldingen «Kan ikke bekrefte serveridentitet» på iPhone kan være forstyrrende, spesielt når den hindrer deg i å få tilgang til viktige e-poster eller nettsteder. I de fleste tilfeller vil enkle trinn som å starte telefonen på nytt, oppdatere iOS eller legge til e-postkontoen din på nytt løse problemet. Men hvis disse standardløsningene ikke fungerer, er det sannsynlig at rotårsaken ligger dypere i iOS-systemet.
Det er her AimerLab FixMate viser seg å være uvurderlig. Med standardmodus kan du fikse feilen uten å miste et eneste bilde, en melding eller en app. Den er rask, pålitelig og spesielt utviklet for å håndtere de typene feil som standard feilsøking ikke kan håndtere.
Hvis iPhonen din fortsetter å vise serveridentitetsfeilen til tross for din beste innsats, ikke kast bort tiden på å stresse – last ned
AimerLab FixMate
og la den gjenopprette iPhone-funksjonaliteten din på få minutter.
- Hvordan forfalske Pokemon Go på iPhone?
- Oversikt over Aimerlab MobiGo GPS Location Spoofer
- Hvordan endre plassering på iPhone?
- Topp 5 falske GPS-posisjonsspoofere for iOS
- GPS Location Finder Definition og Spoofer-forslag
- Slik endrer du posisjonen din på Snapchat
- Hvordan finne/dele/skjule plassering på iOS-enheter?